Thursday, June 28, 2018

Up, Up and Away!

Here in Boise, Idaho, we have an annual festival called the Spirit of Boise Balloon Classic. For one week in late August, the skies are filled with the brilliant colors and extraordinary shapes of hot air balloons. (Photo credit: www.spiritofboise.com) 


This festival inspired my latest card creation. I just love the gorgeous "Follow Your Dreams" 3D hot air balloon stickers that you can get for free with a qualifying order from FSJ. They are retiring June 30 and only available while supplies last. 


The stickers are two and three layers deep, and add so much texture and color to your card. When used in combination with the FSJ Cloud Dreams dies and some leftover bits of Mirror Gold paper, they make a really beautiful, sunny card to brighten anyone's day. And about that Mirror Gold paper - it's on the expensive side because it is very high quality, so don't waste a single scrap. The ultra thin strips at the top and bottom of this card were leftovers from a previous project. 


The "thinking of you" message from the brilliant, versatile Inside & Out stamp set is perfect for this card. The front sentiment is heat set with Journey Gold Embossing Powder on Journey Vellum, which is thick enough to withstand the heat of the Journey Heat Tool without warping. Inside the card is a sweet message about spreading sunshine, which this card will certainly do. Consider using these balloons for a birthday card, or even a graduation note!


Supplies List


  • Stamps: Inside & Out
  • Dies: Cloud Dreams Bundle
  • Inks: Clear Pigment Ink
  • Cardstock: Whip Cream, Mirror Gold, Journey Vellum
  • Coloring Tools: Journey Gold Embossing Powder
  • Embellishments: Follow Your Dreams adhesive stickers
  • Adhesives: Journey Craft Glue, Journey Foam Squares, Mini Glue Dots
To purchase these supplies and so much more, visit my FSJ store front. 

Wednesday, June 20, 2018

Coffee Gift Set

Some days you just can't function without a good cuppa Joe. "First coffee, then do all the things," am I right? Coffee gifts, cards, and images are all the rage these days, for good reason. Fun Stampers Journey has an adorable set of coffee stamps and dies to meet all your caffeinated needs.

This gift set uses both the Coffee Helps stamp and die bundle, and the Coffee First die set which can make both hot coffees and cold, blended coffee drinks. You could also make smoothies with this adorable die set!


I used both of these versatile sets to create a coffee themed gift set in cozy colors that would be perfect for a Christmas gift, or winter birthday. I know it's only June, but it's never too late to get started on your Christmas list!


I've used the Journey Squares and Journey Rectangle dies to create a faux Polaroid frame to highlight the sentiment, and I've decorated the card with various images from the stamp set. I made the tag using the ever-useful Bread Tag die, and decorated it with die cuts from the Coffee First set. 


On yesterday's post, I taught you how to make your own custom faux Washi tape, using the Tape It stamp set. I attached a couple pieces to my card using Journey Craft glue, which won't show behind the Journey Vellum. The straw on the tag is also made using the same technique. 

Finally, the Ink Splat ATS really looks like spilled coffee when stamped in Hazelnut Blend ink. I stamped it on the envelope to tie it all together. 


Supplies List

  • Stamps: Coffee Helps, Tape It, Ink Splat ATS
  • Dies: Coffee Helps, Coffee First, Bread Tag, Journey Rectangles, Journey Squares
  • Inks: Oatmeal Cookie, Hazelnut Blend, Dark Roast, Cranberry Crisp
  • Cardstock: Whip Cream, Cool Pool, Oatmeal Cookie, Dark Roast, Corrugated Stock, Journey Vellum
  • Coloring Tools: Journey Color Burst Pencils
  • Adhesives: Journey Craft Glue, Journey Foam Squares, Mini Glue Dots
To purchase these supplies and so much more, visit my FSJ store front. 

Tuesday, June 19, 2018

Technique: DIY Custom Washi Tape

How many rolls of Washi Tape do you own? I'll bet I've collected at least 30 different colors, patterns, and widths. It's such a fun, inexpensive way to dress up a card. But all those rolls can really add up and sometimes you just run out of space to store them all. So here's a fun tip! You can create your own Washi tape to match your project. The Tape It stamp set by Fun Stampers Journey allows you to create your own Washi tape in a number of different patterns, and any color you want. 


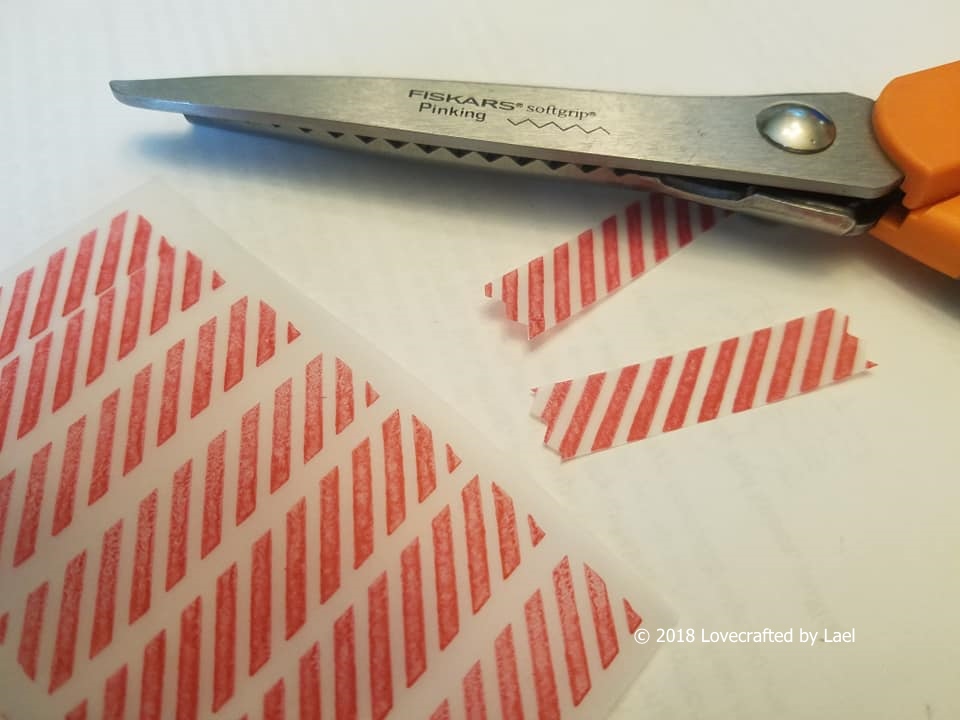
You can stamp it onto plain white paper and it looks great. But if you want that true Washi tape transparent look, try stamping it on Journey Vellum and then cutting each end with a pair of pinking shears or other deckle edged scissors (or just tear it!) 


FSJ's True Color Fusion Inks can be stamped on just about any surface. It takes a while to dry on vellum and I'm impatient, so I used my Journey Heat Tool to set it in just a few seconds. Did you know that you can heat emboss on Journey Vellum? Our high-quality vellum is thicker than the typical vellum you can find at your local craft store, so it doesn't warp under the heat. Try embossing your Washi designs in any color of embossing powder you like. It looks spectacular in gold!


Check my blog tomorrow to see a card using my custom Washi tape. Here's a sneak peek:


Friday, June 15, 2018

Technique: Sunset Skies

I've had a crazy week and I needed to whip out a bunch of quick Father's Day cards for all the wonderful dads in my life. Here's a quick card that you can make with just a few supplies.


Using Glossy White cardstock and a few colors of Fun Stampers Journey True Color Fusion Ink Pads, you can make a quick and colorful sunset background. Simply swipe each color of ink pad across the cardstock, starting with the lightest color first (this is important so you don't contaminate your light ink pads with a dark color.) Overlap the colors so that they are well blended. The heavy pigment in FSJ pads makes them stay wet for a few minutes on glossy surfaces, so you can also use your finger to gently blend the colors once you've applied them all. No need to heat set it, it will dry completely in ten to fifteen minutes.

Next, use Black Licorice Ink to stamp your images. Here, I've used two inexpensive stamp sets, the treeline silhouette from Stay Wild ATS, and the airplane from Begin Adventure ATS.

Finally, heat emboss your choice of sentiment on a strip of black cardstock and viola!

Supplies List

  • Stamps: Stay Wild ATS, Begin Adventure ATS
  • Inks: Black Licorice True Fusion Ink, Clear Pigment Ink, Cosmic Grape, Candy Apple, Tangerine Tango, Pineapple Smoothie
  • Cardstock: Black Licorice, Glossy White
  • Coloring Tools: Whip Cream Embossing Powder
  • Adhesives: Journey Craft Glue

  • To purchase these supplies and so much more, visit my FSJ store front. 

Friday, June 8, 2018

It's a Cocktails & Cards Party!

A quick post today, since I'm getting ready for a party! A dear friend and long-time customer of mine is holding a Cocktails & Cards Party in a few weeks, and I designed this party invitation especially for her. Cocktail Party is a retired stamp set, but I couldn't resist its whimsical design. The line drawing lends itself so well to bright colors, sparkle, and glazed glasses. I love that you can make the striped straw in the tall glass match your striped paper with the Striped Wall Background stamp. In this case, I chose black and white, but you could make it any color. The background is so simple to create with the Ink Splash embossing folder for a fizzy effect. And don't forget the matching envelope!

If you'd like to schedule a FREE card party in the Boise area, please message me through the Contact Me link at the top of the page. I'd love to get artsy with you and your friends!


Supplies List

  • Stamps: Cocktail Party, Striped Wall background stamp
  • Dies: Journey Circles, Ink Splash Embossing Folder
  • Inks: Black Licorice True Fusion Ink, Clear Pigment Ink
  • Cardstock: Whip Cream, Black Licorice, Outrageous Pink, Electric Lime
  • Coloring Tools: Journey Color Splash Pencils, Journey Blending Brush Small, Sparkle Silk, Whip Cream Embossing Powder
  • Adhesives: Journey Craft Glue, Journey Foam Squares, Journey Glaze
  • Tools: Bloom Tool (piercing tip)

    To purchase these supplies and so much more, visit my FSJ store front. 

Wednesday, May 30, 2018

Technique: PanPastels on Black Paper

PanPastels are my favorite coloring tool, and I find myself constantly looking for new ways to use them. It's easy to always reach for white paper when you're planning to stamp and color, but why not try something totally different?


Here's a fun technique that you can try with PanPastels. They look amazing on black paper! Here, I used Black Licorice embossing powder to emboss several flowers on Black Licorice cardstock, using the Pretty Petals stamp set by FJS (retiring June 30). Then I used the Sofft Tools wand with the "slipper" tip to apply four colors of PanPastels: Whip Cream and Pool Play on the small flowers, and Sweet Berry and Banana Cream on the large flowers. 


I added a few "dew drops" of Journey Glaze, and a white embossed sentiment from the Good Karma stamp set (also retiring June 30.) The result is a striking but simple card that you can complete in just a few minutes. This technique would make a beautiful sympathy card as well.

Tip: You do not need to set PanPastels with any kind of fixative, as they cure on their own in about 24 hours. However, if you choose to use a fixative, please be sure to use a very light coating of artist-grade fixative so that it won't change the color of your pastels, or degrade to yellow over time. Many people mistakenly use hairspray, which will turn yellow within about a year. Your work is ART! Treat it accordingly.


Supplies List

Stamps: Pretty Petals, Good Karma
Inks: Clear Pigment Ink
Cardstock: Black Licorice
Coloring Tools: PanPastels, Black Licorice Embossing Powder, Whip Cream Embossing Powder
Adhesives: Journey Craft Glue, Journey Foam Squares, Journey Glaze

To purchase these supplies and so much more, visit my FSJ store front.

Tuesday, May 22, 2018

Grandma's Hummingbird

My late grandmother adored hummingbirds, and she had several feeders hanging just outside her living room window. We would watch them flittering about for hours on end. It's one of my favorite memories from my childhood. I made this card in honor of my Grandma and her favorite species, the Ruby-Throated Hummer.


First, I created the background using red and orange PanPastels to create a sunset effect. Then I layered Whip Cream cardstock onto a White Liner (sticky paper) sheet, and die cut the Floral View background, peeled the sticker backing off and adhered it to my card. Next, I heat embossed the "thank you" sentiment from Embroidered Greetings, onto a strip of Black Licorice cardstock.


Next, I used Clear Pigment Ink to stamp the bird on Whip Cream cardstock. Then I gently rubbed Panpastels over the ink to create the colored feathers of the bird. I die cut him with the coordinating dies, and then sponged the edges with black ink.


Finally, I spiraled a length of Black Licorice twine and tacked it down in a few places with Mini Glue Dots before layering on the bird using Foam Squares. This loop of twine gives the feeling of motion to mimic the constant flutter of a hummingbird's tiny wings. A few strategically placed Cut Rhinestones and some Sparkle Silk on the feathers finishes off this card for a dear friend.

Supplies List

  • Stamps: Sweet Petunias, Embroidered Greetings
  • Dies: Sweet Petunias, Floral View
  • Inks: Clear Pigment Ink
  • Cardstock: Whip Cream, Black Licorice
  • Coloring Tools: PanPastels, Sparkle Silk, Whip Cream Embossing Powder
  • Embellishments: Black Licorice Twine, Cut Rhinestones
  • Adhesives: Journey Craft Glue, Journey Foam Squares, Mini Glue Dots
To purchase these supplies and so much more, visit my FSJ store front.