Showing posts with label Designer Frames. Show all posts

Tuesday, July 10, 2018

Technique: Painting with PanPastels and Sparkle Silk

It's #TechniqueTuesday, friends! In today's card, I'll be teaching you how to paint on dark cardstock with a mix of PanPastels and Sparkle Silk. It is difficult to photograph the beauty of this shimmery technique, so you'll just need to try it for yourself!


To begin, I embossed the huge butterfly from the Bold Wings stamp set with Black Licorice Embossing Powder on Black Licorice cardstock. Then I used FSJ Sparkle Silk and mixed a little Bubblegum Pink PanPastel dust into the Silk, which created a shimmery pink silk. Gently use the side of a Sofft Tool wand on the surface of the powder to create a tiny amount of dust --- you only need a little. Scrape it onto an acrylic block or Clear View Sheet, then drop in a few drops of Sparkle Silk at a time and smoosh it around until you get the color of shimmery paint that you desire. 


Next, I painted it onto the butterfly with a small Blender Pen. I carefully painted adjacent cells of the butterfly's wing with varying layers of paint so that it really looked realistic. As you move the card around in the light, the shimmer is just spectacular.


A few splashes of the pure Sparkle Silk, a bow of Journey Black Licorice Gingham Ribbon, and you have a striking card to share with a friend and brighten their day!

The Bold Wings stamp set retires June 30, so contact me if you'd like to get it before it flies away!


Supplies List

Stamps: Bold Wings
Dies: Designer Frames
Inks: Clear Pigment Ink
Cardstock: Black Licorice, Bubble Gum
Coloring Tools: PanPastels, Sparkle Silk, Black Licorice Embossing Powder, Whip Cream Embossing Powder
Embellishments: Black Licorice gingham ribbon
Adhesives: Journey Craft Glue, Mini Glue Dots
Tools: Acrylic Block or Clear View Sheet

To purchase these supplies and so much more, visit my FSJ store front.

Tuesday, July 3, 2018

A Square Affair

I just love a square card. They cost a few cents more to mail, but I think it's worth it because the square shape is an easy way to create a little extra drama in your designs. Did you know the US Postal Service sells stamps specifically for square cards, and also special stamps that include the surcharge for hand-canceling, in case you have "chubby" embellishments that prevent your card from being machined.

This quick, simple card uses the Dandelion Wishes stamp set and PanPastels to create a sunny, summery greeting. It's so quick and easy, you'll want to try it too!


Simply mask off the area you want to color in, using low-tack tape such as Post-It Tape, or painter's tape. (TIP: stick the tape to your arm first to remove some of the tackiness. When removing the tape, pull slowly, straight back from your paper, at a steep angle. This will help to prevent your paper from tearing.) 

Next, gently rub orange and yellow pastels into the paper until you get the desired color, leaving some lighter spots for interest. Stamp a few dandelions in Sweet Berry ink, then emboss a few with white embossing powder.

Line a sheet of Sweet Berry cardstock with White Liner sheet, and die-cut four of the same sentiment using the Designer Frames die set. Layer these four pieces together and you'll have a thick sentiment that resembles chipboard without all the work of covering, cutting and sanding it. Next, coat the sentiment and the outside edge of the card with Sparkle Silk. 


Finally, mix a little Journey Glaze with colored re-inker and Sparkle Dust (fine glitter) and drop a few drops at the bottom. This is a very inexpensive way to add embellishments for that WOW factor.


Supplies List

  • Stamps: Dandelion Wishes
  • Dies: Designer Frames Die Set
  • Inks: Clear Pigment Ink, Sweet Berry True Fusion Ink, Summer Days Re-Inker
  • Cardstock: Whip Cream, Sweet Berry
  • Coloring Tools: PanPastels, Sparkle Silk, Whip Cream Embossing Powder
  • Embellishments: Sparkle Dust glitter
  • Adhesives: Journey Glaze, Journey Craft Glue, White Liner Sheets, Scotch Blue Painter's Tape for Delicate Surfaces

    To purchase these supplies and so much more, visit my FSJ store front. 

Wednesday, April 4, 2018

Mirror, Mirror

I love quick, simple cards for those days when you need to send handmade kindness but you have just a few minutes available to create something spectacular. It can be done! I promise. Here, I've backed a sheet of Whip Cream cardstock with a White Liner (sticky paper) sheet, and then die cut it with the Layered Leaves die. This makes the back of the die cut piece all sticky on the back, so you can attach it right to the Mirror Gold paper without using any additional adhesive.


Next, I layered a strip of vellum, and then a butterfly from the Small Things stamp set, heat embossed in Black Licorice and then colored quickly with PanPastels. (Tip: Our Journey Craft Glue dries clear underneath vellum!) Finally, I layered black cardstock onto a White Liner sheet, and die cut 3 of the "congrats" sentiment from the Designer Frames die set. I peeled off the sticker backing paper and layered the 3 sentiments on top of each other. Then I coated the sentiment with Journey Glaze to make it thick and shiny.

In less than 30 minutes (minus drying time) this card is finished!


Supplies List

  • Stamps: Small Things
  • Dies: Small Things, Designer Frames, Layered Leaves
  • Inks: Clear Pigment Ink
  • Cardstock: Whip Cream, Black Licorice, Mirror Gold, Journey Vellum
  • Coloring Tools: PanPastels, Black Licorice Embossing Powder
  • Adhesives: Journey Craft Glue, Journey Foam Squares, Mini Glue Dots, Journey Glaze, White Liner Sheets

To purchase these supplies and so much more, visit my FSJ store front. 

Sunday, January 21, 2018

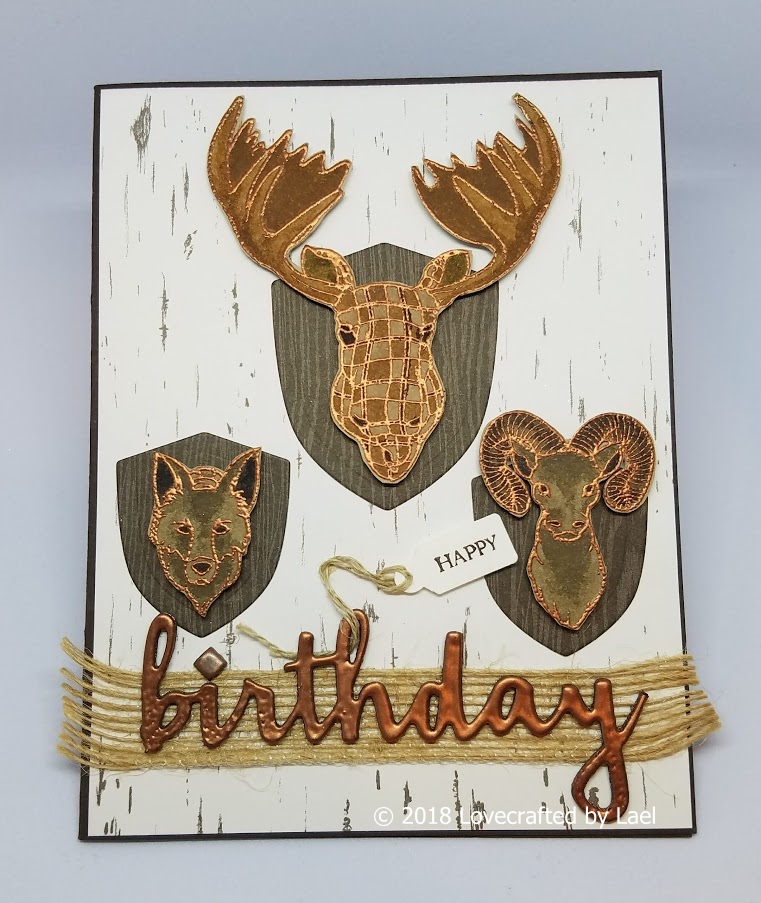
Copper Trophies

Growing up in rural Idaho, my father hunted to feed our family, not for sport, but he has kept a few of the best trophies from his hunts to decorate the walls in the den. So when I saw these wonderful trophy heads in the Great Outdoors stamp set, I knew I had to make a birthday card for my favorite hunter.


I used Copper Embossing Powder on Oatmeal Cookie cardstock, and then shaded each animal using Color Burst pencils, being careful to put emphasis on the eyes and noses so they don't get lost in the unique patterns of these stamps. 


The birthday sentiment is cut from Dark Roast cardstock, using the die from the Designer Frames die set. I cut it out, then smooshed it into a Clear Pigment ink pad, then into Copper Embossing Powder and heat set the powder. I repeated this process several times until I got a thick layer of embossing that resembles beaten copper.


Supplies List

  • Stamps: The Great Outdoors
  • Dies: Designer Frames
  • Inks: Clear Pigment Ink
  • Cardstock: Whip Cream, Dark Roast
  • Coloring Tools: Journey Color Burst Pencils, Copper Embossing Powder
  • Adhesives: Journey Craft Glue, Journey Foam Squares, Mini Glue Dots
To purchase these supplies and so much more, visit my FSJ store front.